Monday, May 1, 2017

Micro ORM (Dapper) in C#

What is the ORM ?

 ORM framework enables developers to work with relational data as domain specific objects. 

 Eg : EntityFramwork, NHibernate

What is Micro ORM ? 

 Micro ORM is doing the same thing as ORM framework. But it has following additional features.

  • Fast
  • lightweight
  • Simple/Easy to use
Eg : Dapper, OrmLite, PetaPoco, Massive, Simple.Data

Micro ORM Performance 

Source : https://github.com/StackExchange/Dapper
 Dapper Demo

You can download full source code from following github ULR.


1. Run the SQL script named by "DapperDemo.sql" which is under Script folder. This will create the database which  we are going to use through out our demo.

2. Create an empty solution called DapperDemo and add new class library called DapperDemo.

3. Create new folder named by Model inside DepperDemo project and create following model classes inside the folder.

  • Department


  • Employee


  • Address

3. Add dapper library to DapperDemo project using nuget.


4. Create an interface called IEmpoyeeRepository and add following method signature on it.


5. Create new class called EmpoyeeRepository and implement it using IEmpoyeeRepository. Implement all the methods as below.


using System.Collections.Generic;
using System.Configuration;
using System.Data;
using System.Data.SqlClient;
using System.Linq;
using Dapper;
using System.Transactions;

namespace DapperDemo
{
    public class EmployeeRepository : IEmployeeRepository
    {
        private IDbConnection db;

        public EmployeeRepository()
        {
            IDbConnection db = new SqlConnection(ConfigurationManager.ConnectionStrings["DapperDemoDB"].ConnectionString);
        }

        public Employee Find(int id)
        {
            return this.db.Query<Employee>("SELECT * FROM Employee WHERE Id = @id", new { id }).SingleOrDefault();
        }

        public Employee FindFullEmployee(int id)
        {
            var sqlQuery =
                "SELECT * FROM Employee WHERE Id = @Id; " +
                "SELECT * FROM Address WHERE EmployeeId = @Id";

            using (var multipleResult = this.db.QueryMultiple(sqlQuery, new { Id = id }))
            {
                var employee = multipleResult.Read<Employee>().SingleOrDefault();
                var addresses = multipleResult.Read<Address>().ToList();

                if (employee != null)
                {
                    employee.Addresses.AddRange(addresses);
                }

                return employee;
            }
        }

        public List<Employee> GetAll()
        {
            return this.db.Query<Employee>("SELECT * FROM Employee").ToList();
        }

        public Employee Add(Employee employee)
        {
            var sqlQuery =
                "INSERT INTO Employee(FirstName,LastName,Email,DepartmentId)" +
                " VALUES(@FirstName,@LastName,@Email,@DepartmentId);" +
                "SELECT CAST(SCOPE_IDENTITY() as int)";
            var id = this.db.Query<int>(sqlQuery, employee).Single();
            employee.Id = id;

            return employee;
        }

        public Employee Update(Employee employee)
        {
            var sqlUpdateQuery =
                "UPDATE Employee  SET "+
                "   FirstName    = @FirstName, "+
                "   LastName     = @LastName," +
                "   Email        = @Email,"+
                "   DepartmentId = @DepartmentId "+
                "WHERE Id=@Id";

            this.db.Execute(sqlUpdateQuery, employee);

            return employee;
        }

        public void Remove(int id)
        {
            db.Execute("DELETE Employee WHERE Id=@id", new { id });
        }

        public void AddFullEmployee(Employee employee)
        {
            using (var transactionScope = new TransactionScope())
            {
                if (employee.IsNew)
                {
                    this.Add(employee);
                }
                else
                {
                    this.Update(employee);
                }

                foreach (var addr in employee.Addresses.Where(a => !a.IsDeleted))
                {
                    addr.EmployeeId = employee.Id;

                    if (addr.IsNew)
                    {
                        this.Add(addr);
                    }
                    else
                    {
                        this.Update(addr);
                    }

                }

                foreach (var addr in employee.Addresses.Where(a => a.IsDeleted))
                {
                    this.db.Execute("DELETE FROM Address WHERE Id = @Id", new { addr.Id });
                }

                transactionScope.Complete();
            }
        }

        public Address Add(Address address)
        {
            var sql =
                "INSERT INTO Address (Street, Address1, Country, PostalCode, EmployeeId) VALUES(@Street, @Address1, @Country, @PostalCode, @EmployeeId); " +
                "SELECT CAST(SCOPE_IDENTITY() as int)";
            var id = this.db.Query<int>(sql, address).Single();
            address.Id = id;
            return address;
        }

        public Address Update(Address address)
        {
            this.db.Execute("UPDATE Address " +
                "SET Street = @Street, " +
                "    Address1 = @Address1, " +
                "    Country = @Country, " +
                "    PostalCode = @PostalCode, " +
                "    EmployeeId = @EmployeeId " +
                "WHERE Id = @Id", address);
            return address;
        }
    }
}


6. Now you can call this repository from Unit test project or  console application.

Happy Coding!!!!!!!!!!!!!


Sunday, May 29, 2016

Introduction to Generic in C#

Generic introduced with version 2.0 of C# language. Generics introduce to the .NET Framework the concept of "Type Parameters", which make it possible to design classes and methods that defer 
the specification of one or more type until the class or method is declared and instantiated by client code.

Generic classes and methods combine re-usability, type safety and efficiency in a way that their non generic counterpart cannot. Like wise we can say benefits for generic can listed as below.

Benefits of Generic
  1.  Allow write code  library method which are type-safe.
  2. Because of generic being used, compiler can perform compile-time checks on code for type safety.
  3. Faster than using objects as it either avoids boxing/un-boxing or casting from objects to the required reference type.
  4. Allow you to write code which is applicable to many type with the same underlying behavior.
Generic Type Parameters

In a generic type or method definition, a type parameter is a placeholder for a specific type that a client specifies when they instantiate a variable of the generic type.

Example: A generic class List<T>, cannot be used as it is since it is not really type. It is like blueprint of a type. client code must declare and instantiate a constructed type by specifying a type argument inside the angle brackets. 
The type argument for this particular class can be any type recognized by the compiler. 
(Microsoft)

Type Parameter Naming Guideline
  • Do name generic type parameters with descriptive names, unless a single letter name is completely self explanatory and a descriptive name would not add value.
 public interface ISessionChannel<TSession>
  • Consider using T as the type parameter name for types with one single letter type parameter.
 public int IComparer<T>() { return 0; }
  • Do prefix descriptive type parameter names with "T".
 public interface ISessionChannel<TSession>
        {
          TSession Session { get; }
         }
  • Consider indicating constraints placed on a type parameter in the name of parameter. For example, a parameter constrained to ISession may be called TSession.
Constraints on Type Parameters
C# allow you to add restrictions to the kinds of types that can client code can use for type arguments when you instantiates your generic class.To perform this task you need to use where contextual keyword. According to Microsoft you can apply six type of constraints.
  •  where T: struct  - The type argument must be value type except Nullable.
  • where T: class - The type argument must be reference type(class,delegate,interface or array type).
  • where T: new() - The type argument must have a public parameter-less constructor.
  • where T: <base class name> -The type argument must be or derive from the specified base class.
  • where T: <interface name> - The type argument must be or implement the specified interface/s.
  • where T: U - The type argument supplied for T must be or derive from argument supplied for U.
In next tutorial we will implement repository design pattern using generic.


Saturday, May 10, 2014

WPF Child Window with MVVM Design Pattern

In this article I'll discuss how to develop reusable WPF child window using MVVM designed pattern.

Prerequisites :

1. Basic Knowledge of MVVM Design Pattern.
2. Basic Knowledge of Action<T> Delegate in C#.
3. Basic Knowledge of XAML development.
4. Visual Studio 2013 (You can use another version of VS).
5. Microsoft PRISM 4.1 - Microsoft.Practices.Prism.dll (We use this prism library to implement the WPF delegate command).
6. Basic knowledge about Singleton design pattern.

In this article, I will demonstrate how to pass the parameters from parent window to child window and also from child window to parent window.

So now we will start our journey .....  :)

1. Create new WPF project called "MVVMChildWindow" using your visual studio IDE.

2. Delete "MainWindow.xaml" page your solution. Add new Window (WPF) called "MainView.xaml" to your solution.


3. Open app.xaml file and update StartupUri as "MainView.xaml".


4. Add new class called "Person" to your project and implement the  class as bellow.


Also add another class called "BaseViewModel" and implement that class as bellow.


5. Add new folder called "ChildWindow" to your solution. After that add another two folder called "View" and "ViewModel" to "ChildWindow" folder. Now your folder hierarchy should be like this.


(Anyway you don't need to follow same hierarchy and naming convention. But as a best practice I encourage you to  follow the similar hierarchy and naming convention.)

6. Add new class called "AddUserViewModel" to ViewModel folder. and Implement the class as bellow.

using Microsoft.Practices.Prism.Commands;
using System;
using System.Collections.Generic;
using System.Linq;

namespace MVVMChildWindow.ChildWindow.ViewModel
{
    public class AddUserViewModel : BaseViewModel
    {
        #region Events

        public event Action<Person> Closed;

        #endregion

        #region Constructor
        public AddUserViewModel(int personId)
        {
            persons = new List<Person>()
            {
                new Person(){Id=1,Address="Blk 244/A",Email="email1@gmail.com",FirstName="FirstNameA",LastName="LastNameA"},
                new Person(){Id=2,Address="Blk 244/B",Email="email2@gmail.com",FirstName="FirstNameB",LastName="LastNameB"},
                new Person(){Id=3,Address="Blk 244/C",Email="email3@gmail.com",FirstName="FirstNameC",LastName="LastNameC"},
                new Person(){Id=4,Address="Blk 244/D",Email="email4@gmail.com",FirstName="FirstNameD",LastName="LastNameD"},
                new Person(){Id=5,Address="Blk 244/E",Email="email5@gmail.com",FirstName="FirstNameE",LastName="LastNameE"},
                new Person(){Id=6,Address="Blk 244/F",Email="email6@gmail.com",FirstName="FirstNameF",LastName="LastNameF"},
                new Person(){Id=7,Address="Blk 244/G",Email="email7@gmail.com",FirstName="FirstNameG",LastName="LastNameG"},
                new Person(){Id=8,Address="Blk 244/H",Email="email8@gmail.com",FirstName="FirstNameH",LastName="LastNameH"},
            };

            okCommand = new DelegateCommand(SavePerson);

            this.PersonId = personId;

            Init();
        } 
        #endregion

        #region Public Properties

        public int PersonId { get; set; }

        private string firstName;
        public string FirstName
        {
            get { return firstName; }
            set 
            { 
                firstName = value;
                RaisePropertyChanged("FirstName");
            }
        }

        private string lastName;
        public string LastName
        {
            get { return lastName; }
            set
            {
                lastName = value;
                RaisePropertyChanged("LastName");
            }
        }

        private string address;
        public string Address
        {
            get { return address; }
            set
            {
                address = value;
                RaisePropertyChanged("Address");
            }
        }

        private string email;
        public string Email
        {
            get { return email; }
            set
            {
                email = value;
                RaisePropertyChanged("Email");
            }
        }

        private List<Person> persons;
        public List<Person> Persons
        {
            get { return persons; }
            set { persons = value; }
        }
        

        #endregion

        #region Command Properties

        private DelegateCommand okCommand;
        public DelegateCommand OkCommand
        {
            get { return okCommand; }
        }

        #endregion

        #region Private Methods
        private void SavePerson()
        {
            if (Closed != null)
            {
                var person = new Person()
                {
                    Address = address,
                    Email = email,
                    FirstName = firstName,
                    LastName = lastName,
                    Id = PersonId
                };

                Closed(person);
            }
        }

        private void Init()
        {
            var person = persons.FirstOrDefault(p => p.Id == PersonId);
            FirstName = person.FirstName;
            RaisePropertyChanged("FirstName");
            LastName = person.LastName;
            RaisePropertyChanged("LastName");
            Email = person.Email;
            RaisePropertyChanged("Email");
            Address = person.Address;
            RaisePropertyChanged("Address");
        }

        #endregion
    }
}

Here you can see that, we have declared event action delegate named by Changed. When SavePerson method called, Changed event action will fire and  all the objects who registered this event will  notified with modified person data..

7.  Add new UserControll (WPF) called "AddUserView.xaml" into view folder and implement the view as bellow.

<UserControl x:Class="MVVMChildWindow.ChildWindow.View.AddUserView"
             xmlns="http://schemas.microsoft.com/winfx/2006/xaml/presentation"
             xmlns:x="http://schemas.microsoft.com/winfx/2006/xaml"
             xmlns:mc="http://schemas.openxmlformats.org/markup-compatibility/2006" 
             xmlns:d="http://schemas.microsoft.com/expression/blend/2008" 
             mc:Ignorable="d" 
             Width="450"
             Height="200">
    <Grid Background="#FFB0D1EC" Margin="10">
        <Grid.RowDefinitions>
            <RowDefinition Height="5"/>
            <RowDefinition Height="30"/>
            <RowDefinition Height="5"/>
            <RowDefinition Height="30"/>
            <RowDefinition Height="5"/>
            <RowDefinition Height="30"/>
            <RowDefinition Height="5"/>
            <RowDefinition Height="30"/>
            <RowDefinition Height="5"/>
            <RowDefinition Height="30"/>
            <RowDefinition Height="5"/>
        </Grid.RowDefinitions>
        
        <Grid.ColumnDefinitions>
            <ColumnDefinition Width="150"/>
            <ColumnDefinition Width="*"/>
        </Grid.ColumnDefinitions>
        
        
        <TextBlock Grid.Row="1" Text="First Name :" Grid.Column="0" VerticalAlignment="Center" HorizontalAlignment="Left" Margin="15,0,0,0"/>
        <TextBox Grid.Row="1" Grid.Column="1" Text="{Binding FirstName,Mode=TwoWay}" Width="200" Height="25" VerticalAlignment="Center" HorizontalAlignment="Left"/>

        <TextBlock Grid.Row="3" Text="Last Name :" Grid.Column="0" VerticalAlignment="Center" HorizontalAlignment="Left" Margin="15,0,0,0"/>
        <TextBox Grid.Row="3" Grid.Column="1" Text="{Binding LastName,Mode=TwoWay}" Width="200" Height="25" VerticalAlignment="Center" HorizontalAlignment="Left"/>

        <TextBlock Grid.Row="5" Text="Address :" Grid.Column="0" VerticalAlignment="Center" HorizontalAlignment="Left" Margin="15,0,0,0"/>
        <TextBox Grid.Row="5" Grid.Column="1" Text="{Binding Email,Mode=TwoWay}" Width="200" Height="25" VerticalAlignment="Center" HorizontalAlignment="Left"/>

        <TextBlock Grid.Row="7" Text="Email :" Grid.Column="0" VerticalAlignment="Center" HorizontalAlignment="Left" Margin="15,0,0,0"/>
        <TextBox Grid.Row="7" Grid.Column="1" Text="{Binding Address,Mode=TwoWay}" Width="200" Height="25" VerticalAlignment="Center" HorizontalAlignment="Left"/>

        <Button Grid.Row="9" Grid.Column="1" Width="150" HorizontalAlignment="Left" Content="OK" Command="{Binding OkCommand}"/>
    </Grid>
</UserControl>


8. Now add new folder called "Common" to your project and add new class called "ChildWindowManager"  into newly created folder. Implement the class as bellow.

using System.Windows;

namespace MVVMChildWindow.Common
{
    public class ChildWindowManager : BaseViewModel
    {
        public ChildWindowManager()
        {
            WindowVisibility = Visibility.Collapsed;
            XmlContent = null;
        }

        //Singleton pattern implementation
        private static ChildWindowManager instance;
        public static ChildWindowManager Instance
        {
            get
            {
                if (instance == null)
                {
                    instance = new ChildWindowManager();
                }
                return instance;
            }
        }

        #region Public Properties

        private Visibility windowVisibility;
        public Visibility WindowVisibility
        {
            get { return windowVisibility; }
            set 
            { 
                windowVisibility = value;
                RaisePropertyChanged("WindowVisibility");
            }
        }

        private FrameworkElement xmlContent;
        public FrameworkElement XmlContent
        {
            get { return xmlContent; }
            set 
            { 
                xmlContent = value;
                RaisePropertyChanged("XmlContent");
            }
        }
        
        #endregion

        #region Public Methods

        public void ShowChildWindow(FrameworkElement content)
        {
            XmlContent = content;
            RaisePropertyChanged("XmlContent");
            WindowVisibility = Visibility.Visible;
            RaisePropertyChanged("WindowVisibility");
        }

        public void CloseChildWindow()
        {
            WindowVisibility = Visibility.Collapsed;
            RaisePropertyChanged("WindowVisibility");
            XmlContent = null;
            RaisePropertyChanged("XmlContent");
        } 

        #endregion
    }
}


You can see that, We have used singleton designed pattern to implement this class.

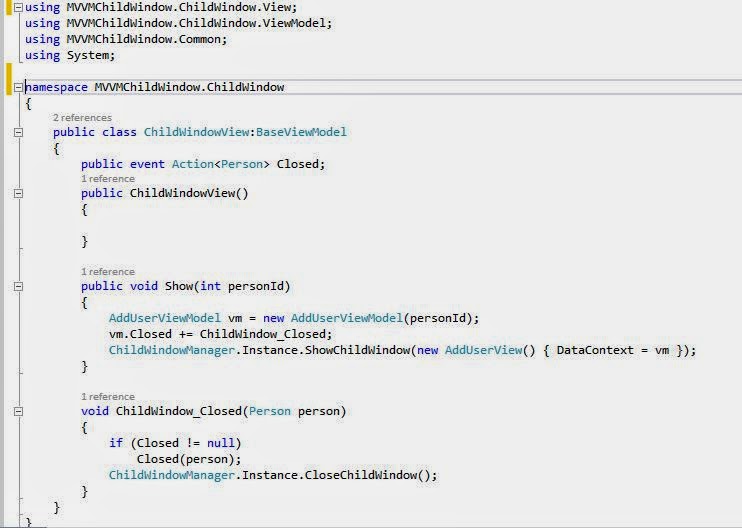
9. Now select the ChildWindow folder and add new class called "ChildWindowView". Implement the class as bellow.


10. Add new class called "MainViewModel" to project. Implement the class as below.

using Microsoft.Practices.Prism.Commands;
using MVVMChildWindow.ChildWindow;

namespace MVVMChildWindow
{
    public class MainViewModel:BaseViewModel
    {
        #region Construction
        public MainViewModel()
        {
            showChildWindowCommand = new DelegateCommand(ShowChildWindow);
        } 

        #endregion

        #region Public Properties

        public int PersonId { get; set; }

        private string firstName;
        public string FirstName
        {
            get { return firstName; }
            set
            {
                firstName = value;
                RaisePropertyChanged("FirstName");
            }
        }

        private string lastName;
        public string LastName
        {
            get { return lastName; }
            set
            {
                lastName = value;
                RaisePropertyChanged("LastName");
            }
        }

        private string address;
        public string Address
        {
            get { return address; }
            set
            {
                address = value;
                RaisePropertyChanged("Address");
            }
        }

        private string email;
        public string Email
        {
            get { return email; }
            set
            {
                email = value;
                RaisePropertyChanged("Email");
            }
        }

        private DelegateCommand showChildWindowCommand;
        public DelegateCommand ShowChildWindowCommand
        {
            get { return showChildWindowCommand; }
        } 

        #endregion

        #region Private Methods

        private void ShowChildWindow()
        {
            var childWindow = new ChildWindowView();
            childWindow.Closed += (r =>
                {
                    FirstName = r.FirstName;
                    RaisePropertyChanged("FirstName");

                    LastName = r.LastName;
                    RaisePropertyChanged("LastName");

                    Email = r.Email;
                    RaisePropertyChanged("Email");

                    Address = r.Address;
                    RaisePropertyChanged("Address");
                });
            childWindow.Show(1);
        } 

        #endregion   
    }
}


11. Add following XAML code to MainView.xaml.

<Window x:Class="MVVMChildWindow.MainView"
        xmlns="http://schemas.microsoft.com/winfx/2006/xaml/presentation"
        xmlns:x="http://schemas.microsoft.com/winfx/2006/xaml"
        Title="MainView">
    <Grid Margin="5">

        <ContentControl
            VerticalAlignment="Stretch" HorizontalAlignment="Stretch" Background="Transparent"
            VerticalContentAlignment="Stretch" HorizontalContentAlignment="Stretch">
            <Grid>
                <Grid.RowDefinitions>
                    <RowDefinition Height="50"/>
                    <RowDefinition Height="*"/>
                </Grid.RowDefinitions>

                <Grid Grid.Row="0" Margin="0,20,0,0">
                    <Button Content="Search Person" Command="{Binding ShowChildWindowCommand}" Width="150"/>
                </Grid>
                <Grid Grid.Row="1" Margin="0,20,0,0">
                    <Grid.RowDefinitions>
                        <RowDefinition Height="5"/>
                        <RowDefinition Height="30"/>
                        <RowDefinition Height="5"/>
                        <RowDefinition Height="30"/>
                        <RowDefinition Height="5"/>
                        <RowDefinition Height="30"/>
                        <RowDefinition Height="5"/>
                        <RowDefinition Height="30"/>
                        <RowDefinition Height="5"/>
                    </Grid.RowDefinitions>

                    <Grid.ColumnDefinitions>
                        <ColumnDefinition Width="150"/>
                        <ColumnDefinition Width="*"/>
                    </Grid.ColumnDefinitions>

                    <TextBlock Grid.Row="1" Text="First Name :" Grid.Column="0" VerticalAlignment="Center" HorizontalAlignment="Left" Margin="15,0,0,0"/>
                    <TextBox Grid.Row="1" Grid.Column="1" Text="{Binding FirstName,Mode=TwoWay}" Width="300" Height="25" VerticalAlignment="Center" HorizontalAlignment="Left"/>

                    <TextBlock Grid.Row="3" Text="Last Name :" Grid.Column="0" VerticalAlignment="Center" HorizontalAlignment="Left" Margin="15,0,0,0"/>
                    <TextBox Grid.Row="3" Grid.Column="1" Text="{Binding LastName,Mode=TwoWay}" Width="300" Height="25" VerticalAlignment="Center" HorizontalAlignment="Left"/>

                    <TextBlock Grid.Row="5" Text="Address :" Grid.Column="0" VerticalAlignment="Center" HorizontalAlignment="Left" Margin="15,0,0,0"/>
                    <TextBox Grid.Row="5" Grid.Column="1" Text="{Binding Email,Mode=TwoWay}" Width="300" Height="25" VerticalAlignment="Center" HorizontalAlignment="Left"/>

                    <TextBlock Grid.Row="7" Text="Email :" Grid.Column="0" VerticalAlignment="Center" HorizontalAlignment="Left" Margin="15,0,0,0"/>
                    <TextBox Grid.Row="7" Grid.Column="1" Text="{Binding Address,Mode=TwoWay}" Width="300" Height="25" VerticalAlignment="Center" HorizontalAlignment="Left"/>

                </Grid>
            </Grid>
        </ContentControl>

        <Border Name="childWindow" Visibility="{Binding WindowVisibility}" Background="#88000000" >
            <ContentControl Content="{Binding XmlContent}" HorizontalAlignment="Center" VerticalAlignment="Center" HorizontalContentAlignment="Stretch" VerticalContentAlignment="Stretch"></ContentControl>
        </Border>
        
    </Grid>
</Window>

12. Go to MainView.xaml.cs class and add following code to class constructor.


13. Now build your project and run the application.If everything is going fine , you will see the following interface.


14. Click on Search Person button. Then child window will be opened.


15. You can edit person detail if you want and click on OK button. Then child window will be closed and person data will be appeared in main window.


Happy Codding !!!!!!!!!!!!!!!!!!!!!!

Sunday, April 20, 2014

Introduction to Parallel Programming in C# Part 1

What is Parallel Programming?

Today PCs and workstations normally have more than 2 cores which enable multiple threads to be execute simultaneously. To get advantage from this multiple cores, we can write our code to distribute the work across  multiple CPUs.To do that with .NET Framework 4.0 Microsoft introduced the new feature called parallel programming. (Apart from the Threading. Because threading was there since .NET framework 1.0).

You have to use Task Parallel Library(TPL), Parallel LINQ and many other support classed to write the application which support for the parallel programming. But in this article I'm mainly going to use the TPL, as an introduction to this topic.

How to write the Simple Task
====================

Example :


Task class, the  most fundamental class for parallel programming. You will notice this class in each and every example in this article. Also we use Factoary.StartNew() methods only for simple task such as no input parameters and no out put result.

Create Basic Task
=================

You can use 4 different ways to create basic task in  C# parallel programming.
 1. Use Action delegate with method

Example :


 2. Use  anonymous delegate.

Example :


 3. Use lambda expression with method name

Example :


 4. Use lambda expression with anonymous method

Example :


How to use Task State
=================
You are able to give the state for a Task by passing an instance of Action<object> . Task State allow to perform similar operation on different data.

Example :


How to getting a Result From Task
==========================

To retrieve the result from your task create a instance of Task<T> where T is type of result that will be return from the task.

Example:


Form Part 2 I will cover another few basic topics in Parallel programming. 

Happy Coding!!!!!!!!!!!!!!!!!!!!!

Saturday, July 13, 2013

WPF busy indicator implementation with Singleton Pattern

What is Singleton pattern ?

Singleton pattern ensure that a class has only one instance and provide a global point of access to that instance. Normally singleton object store data which is common to for all over the application.

Using this pattern now we are going to implement a busy indicator which is going to be a common for your whole WPF application.

Before start the development we need to download  Extended WPF Toolkit and latest Microsoft Prism library and extract those folders to your hard drive. Download links are  :
      Download PRISM

1. Create new WPF project named  by BusyIndicatorExample.

2. Right click on project reference and add the desktop version of  "Microsoft.Practices.Prism.dll" from extracted prism libraries.

3. Now we will implement the singleton class which going to be a data context for our WPF BusyIndictor controller. To do that right click on project  and create new class called BusyIndicatorManager. Implement the class as bellow.

using Microsoft.Practices.Prism.ViewModel;
using System.Collections.Generic;
using System.Linq;

namespace BusyIndicatorExample
{
    public class BusyIndicatorManager : NotificationObject
    {
        #region Membervariables

        private Dictionary<int, string> busyParameters;

        #endregion

        #region Constructor

        private BusyIndicatorManager()
        {
            isBusy = false;
            message = string.Empty;
            busyParameters = new Dictionary<int, string>();
        }

        #endregion

        #region Singleton Implementation

        private static BusyIndicatorManager instance;
        private static object syncRoot = new object();

        public static BusyIndicatorManager Instance
        {
            get
            {
                lock (syncRoot)
                {
                    if (instance == null)
                    {
                        instance = new BusyIndicatorManager();
                    }
                    return instance;
                }
            }
        }

        #endregion

        #region Public Properties

        private bool isBusy;
        public bool IsBusy
        {
            get { return isBusy; }
            private set
            {
                isBusy = value;
                RaisePropertyChanged("IsBusy");
            }
        }

        private string message;
        public string Message
        {
            get { return message; }
            private set
            {
                message = value;
                RaisePropertyChanged("Message");
            }
        }

        #endregion

        #region Public Methods

        public void ShowBusy(int id, string busyMessage)
        {
            if (!busyParameters.ContainsKey(id))
            {
                busyParameters.Add(id, busyMessage);
                IsBusy = true;
                Message = busyMessage;
            }
            else
            {
                busyParameters[id] = busyMessage;
                IsBusy = true;
                Message = busyMessage;
            }
        }

        public void CloseBusy(int id)
        {
            if (busyParameters.ContainsKey(id))
                busyParameters.Remove(id);

            if (busyParameters.Count == 0)
            {
                IsBusy = false;
                Message = string.Empty;
            }
            else
            {
                IsBusy = true;
                Message = busyParameters.Last().Value;
            }
        }

        #endregion
    }
}

Above this singleton implementation you can see that there are two public properties called IsBusy and Message , So they are the going to be bind with WPF busy indicator control. Also you can call ShowBusy and CloseBusy methods from anywhere in you application using singleton instance.

4. Now we will implement the our view for busy indicator. First add "Xceed.Wpf.Toolkit.dll" file as a reference from extracted Extended WPF Toolkit folder.


5. Now we will implement our MainPage.xaml view as bellow.

<Window x:Class="BusyIndicatorExample.MainWindow"
        xmlns="http://schemas.microsoft.com/winfx/2006/xaml/presentation"
        xmlns:x="http://schemas.microsoft.com/winfx/2006/xaml"
        xmlns:xctk="http://schemas.xceed.com/wpf/xaml/toolkit"
        Title="MainWindow" Height="350" Width="525">
    <Grid>
        <Grid.RowDefinitions>
            <RowDefinition Height="40"/>
            <RowDefinition Height="*"/>
        </Grid.RowDefinitions>
        <StackPanel Orientation="Horizontal" HorizontalAlignment="Center">
            <Button Name="btnRunBusy" Height="30" Width="150" Content="Run BusyIndicator" Click="btnRunBusy_Click" Margin="0,0,10,0"/>
            <Button Name="btnCloseBusy" Height="30" Width="150" Content="Close BusyIndicator" Click="btnCloseBusy_Click"/>
        </StackPanel>
        
        <xctk:BusyIndicator Grid.Row="1" Name="busyIndicator" IsBusy="{Binding IsBusy}" BusyContent="{Binding Message}">
            <Grid>
                

            </Grid>
        </xctk:BusyIndicator>
    </Grid>
</Window>

6. Now go to MainWindow.xaml.cs and modify the class implementation as bellow.

In class constructor we assign busy indicator DataContext as singleton instance of BusyIndicatorManager. 

7. Now Run the application and click on Run BusyIndicator button and then busy indicator will visible in our application.


Here we call the ShowBusy method which is implemented in BusyIndicatorManager class, using it's singleton instance. Inside the method we will set IsBusy property into true and Message property with message which are  bind to the BusyIndicator controller in our MainPage.xaml.

8. Now click on the "Close BusyIndicator" button and then running  busy indicator will disappear from the application. Because here we call the CloseBusy method which is implemented in BusyIndicatorManager class using it's singleton instance and Inside the method we set IsBusy property into "False".


Happy Coding!!!!!!!!!!!!!!!!!!!